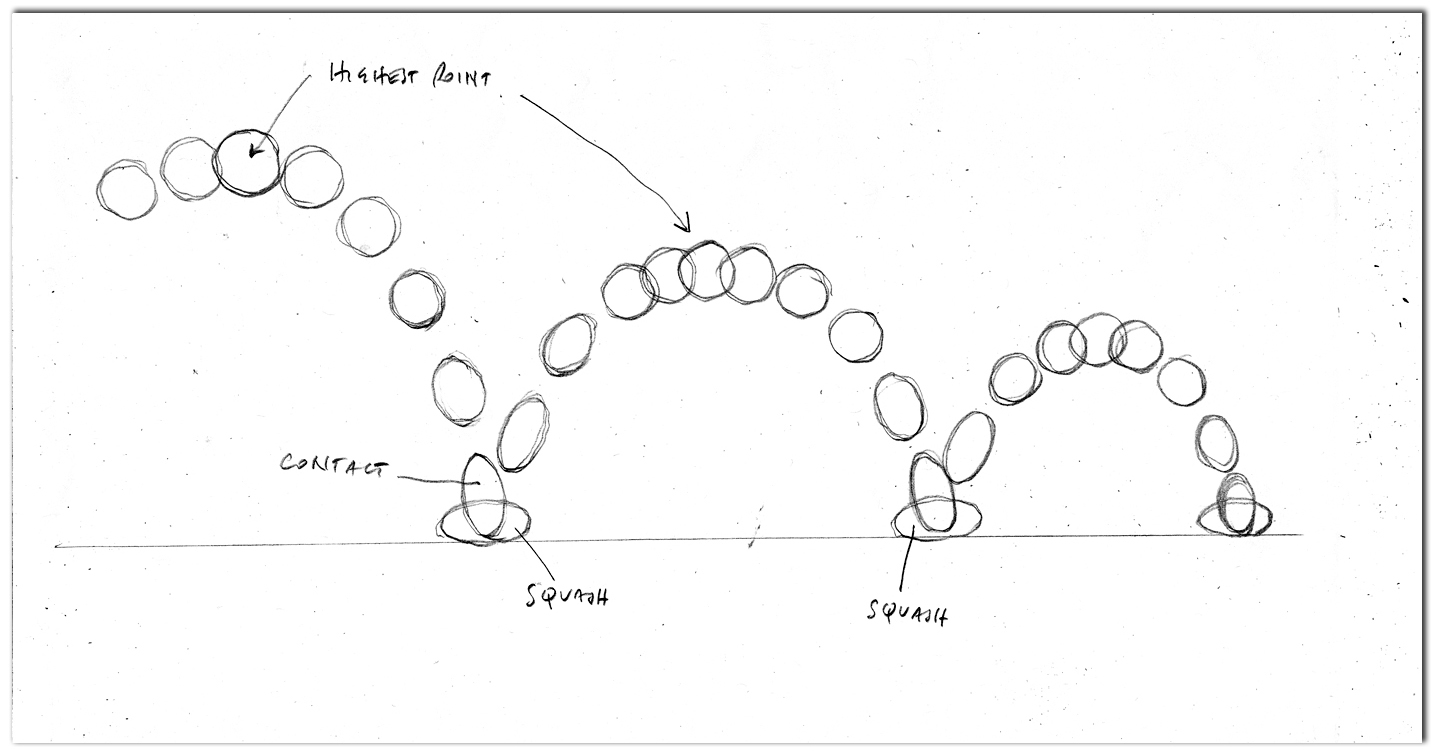
Try this for fun animation practice...
Animate a bouncing ball that stretches and squishes, but don't let it loose or add mass.
is the principal that gives the illusion of weight
and flexibility to objects, this is best shown in animation of bouncing
balls. The most important aspect of squash and stretch is to ensure the
object has a sense of realism even with the most extreme and comical
squash and stretch applied to it, this is done by ensuring that the
volume of the object does not change at any point.
Squash and stretch can be used to differentiate between two objects,
the degree of squash and stretch changes the consistency and sometimes
character of the object in question. Squash and stretch adds realism to
objects because they follow the laws of physics that our eyes recognize
as correct. An accelerating ball for instance will stretch due to the
gravity acting on it, while once the ball hits the floor all that
gravitational potential energy is transferred and causes the ball to
compress, or squash, under this pressure. Similarly on the way back up
on the bounce we would see stretch again as the object pulls away from
the surface.
The amount of squash and stretch is relative to the material in
question, a bowling ball and a tennis ball would have very different
reactions to these forces and would be shown in the squash and stretch.
The bowling ball would have very little compression when hitting the
floor, just as it would have very little stretch on the way down, the
tennis ball would react very differently, we would expect to see much
more exaggerated squash and stretch, as well as more bounces before
coming to a stop.
It is this difference in materials and the effects using bouncing
balls that I have tried to show in my own bouncing ball animation. I
have shown the difference between the two balls by having the lighter of
the two balls show a lot more stretch, however due to the laws of
gravity both balls fall at the same rate, yet once hitting the ground
the lighter ball will bounce a lot higher, with more squash and stretch
implying more elasticity than the heavier ball, clearly showing to the
viewer that the two balls are very difference.
This is the first lesson taught to any animation student. It may seem
boring, but by following it you will grasp most of the principals used
in animation. Study the bouncing ball scene above: Look at it again with
all the frames superimposed.

Now some of the techniques used become easier to see.
1.
Arcs. The ball falls in an elliptical arc through
space. Most things move in an arc of some kind. If the ball were to
move in a straight line between the high and low points of the bounce,
then the action would look very unnatural.
2.
Timing. (or Spacing). As the ball falls it is
accelerated by gravity, the gap between each frame growing all the time
until the ball contacts the ground. As the ball bounces from the ground
the opposite happens: as the ball hops up it moves very fast at first,
then slows down by gravity into the high piont of its bounce. Note that
at the high point of the bounce the ball is weightless…perfectly
balanced between the force of gravity pulling it down, and its own
momentum moving it forward.
3.
Squash and Stretch. As the ball falls it
stretches. When it impacts the ground it squashes. When it bounces off
the ground it stretches again. Note how quickly the ball regains its
circular shape. Too much squash and stretch can make an object look
“mushy”.
4.
Volume. The ball should remain the same mass as
it squashes and stretches. If the ball were to squash too much it would
seem to be growing physically bigger. This is very eye catching, and
looks weird.
How to animate the ball. The process of animating the ball is straightforward. On a single sheet of paper, draw the arc path that the ball will follow.

On this drawing, tick off the position of each ball on the arc path
with an X. Be sure to number them. In feature and tv animation, frames
are usually numbered 1,3,5,7,9 and so on. To simplify things here, let’s
number them 1,2,3,4, etc. For an explanation of why odd numbers are
used in animation, see the appendix at the bottom of the page. It’s
really boring, and should be a really nice cure for insomnia.

If you have a backlight, then switch it on. Put a clean sheet over
the arc path drawing. Now you are ready to begin drawing the “Key”
drawings of the animation: the points where the ball is at its most
extreme. In this example, its highest and lowest points in the bounce.As
you can see, frame 1 is the first and highest point in the sequence. It
is therefore an extreme drawing. Frame 7 is the squash drawing where
the ball hits the ground. It is also an extreme, as are drawings
12,17,21,25,28 and 31.

On separate sheets of paper, you should draw the different key frames
as named above. If done correctly you should have a series of drawing
numbered 1,7,12,17,21,25,28 and 31.Be sure that you write the frame
numbers on the top right and bottom right of each drawing. If your
drawing is a key frame (as these are) then put a circle around the
number.

Place them on the peg bar with the lower numbers on the bottom and
the higher numbers on the top. Now you are ready to “roll” the drawings.
How to Roll the drawings:A lot of people working in
animation seem to forget how tricky this is. It is a fairly easy skill,
it just takes a little practice. Do it slowly at first, as you progress
you’ll begin to do it instinctively. There are people working in the
industry who aren’t smart enough to chew gum and fart at the same time,
and they can do it. So don’t worry. It takes a little time, but you’ll
get the hang of it.

Back to the ball: Now you must add the inbetween frames. These are
the drawings that go between the keys in order to make the action look
smooth. It’s common for these to be called “tweens”, thanks to digital
animation programs – but traditional animators call them “inbetweens”
(the correct term).
All frames are equal, but some frames are more equal than others. You
must determine which is the most important frame to draw next. Which
has the most important action?

In this case, the most important is frame 6. It is the most stretched
frame in the falling sequence. Therefore I would consider this almost
as much a key frame as 1 and 7. If you have a backlight, switch it on.
Put the arc path drawing on the pegs first. Then put down 1. Put down 7.
Then put down a blank sheet. You should see something like this:

Now you are going to draw frame 6. Begin to sketch in the stretched
ball. When stretching the ball, keep the volume consistent. The overall
mass of the ball must be the same. Position it around the x drawn on the
arc path. When you have finished, you will have to flip the paper to
see if it moves right:
How to flip the drawings:
Flipping is similar to rolling, but whereas with rolling you move
through the pages sequentially, here you move from the bottom drawing,
to the top one, then to the middle one. “WHY?” you ask….because this way
you can see the inbetween in motion and make subtle corrections as you
work. Incredible as it seems, this method is far more accurate than a
lighttable.

Watch the paper closely. Notice that both index and middle fingers
are wedged between the top two layers. You begin flipping by holding up
both top sheets of paper towards you. You are now looking at the lowest
frame, frame 1. Then you drop the two sheets down to the board,
revealing the topmost drawing, i.e. the inbetween frame. Then you lift
up the top drawing to reveal the one in the middle, i.e the final
keyframe. It takes time to get the hang of this. It will be well worth
the effort if you do.
Now you will need to add the remaining inbetween drawings between 1
and 5. The easiestway to do this is with a timing chart. Lets look at
what we’ve got so far:

You could “eyeball” all the remaining frames, but the surest way to
do them is by writing a timing chart. It will look something like this:

The timing chart will go on frame 1, beneath the frame number on the
top right of the drawing. This chart tells you that the next most
important drawing is 5. That’s why it’s underlined. Note how the spacing
on the timing chart relates to the spacing on the arc path above. The
chart can determine the position of all the inbetween frames, and also
their weight, mass, speed, etc.
Now you have keyframe 1 with a timing chart, and keyframe 6. Simply
follow the chart, place the arc path on your drawing board, then 1, Then
6, and proceed to follow the timing chart. Draw 5.

Note: see how quickly the ball regained its shape…if you were to
inbetween the shape as well as the position of the ball then the ball
would feel very mushy…by drawing 5 as circular, the scene will be much
snappier. Repeat inbetweening until the first arc of the bounce is
complete. Repeat the process for all frames of the scene.
I have included all the original frames for this scene as digital
files. They should print out onto regular A4 printer paper. You can
print them out and peg them up onto strips of punched paper, allowing
you to roll through the scene. You line them up with the crosshairs on
the corners of the page. Simply paste up frame 1 as you like it, then
put it on your drawing board. Then put down a strip of punched paper,
and position frame 2 with its crosshairs lined up with frame 1.
IMPORTANT: all frames should be positioned against frame 1, otherwise the scene will “drift”.

You can find the files here:
Bouncing ball image files . You’ll need winrar to decompress them (most zip programs should work on them).
Appendix: Numbering drawings.
Most animation is still produced for film and tv. Film is projected
at 24 frames per second (fps). Early cartoons were all drawn with 24
drawings for every second of film, i.e. onedrawing for every frame of
film. Some clever chap finally realised that the animation looked just
as good if only 12 drawings were drawn per second of film. Each drawing
would be shot twice, to keep the overall timing the same. Nobody noticed
the difference, and a lot of carpal tunnel doctors went out of
business.
This discovery can be attributed entirely to prohibition. Animators
of the twenties were notorious alcoholics. Not these days, glad to say.
Today’s breed are wholesome family men, loyal to their wives, good
fathers, upstanding members of society, clean living wackos.
The practice of animating 12 fps is called animating “on twos”, and
the practice of animating 24 fps is called animating “on ones”. It was
still occasionally necessary to animate scenes on ones if a fast action
was required, or if the camera panned over the background, i.e. move
from left to right to follow a character across the screen. Such shots
would look jerky if shot on twos.
When working on twos the animators usually number their frames with
odd numbers. 1,3,5 and so on. Frame one is shot twice, frame two is shot
twice, ad nauseum. If a point in the scene demands a fast action such
as a punch or a shake, then the scene can be switched to ones at
thatpoint. The numbering can then include the even numbers that will
make the action smoother.
If all this sounds like gibberish, don’t worry. It’s not relevant to anything in the next few lessons.
One last comment about timing: Today a lot of animation is made on
computers, and can be projected at any frame rate desired. 10 fps looks
fine. Most Japanese animation has been animated at 8 fps for years…a
method known as animating “on threes”, as each drawing is shot 3 times,
producing 8 frames per second.
That’s it for the ball…
First-
Do some direct sketch observations of a ball. Use a light and play with shading and shadows figure/ground relationships.
Second-
Throw
the ball in the air and observe the weight of the ball, how gravity
effects it. Then draw a bounce sequence on one page [see above
illustration].
Third-
Animate a bounce sequence see below...
View
Angry Animator Tutorial
Or below I grabbed from the angry animator.
This exercise will teach you the most important principles of animation, namely:
Arcs.
Timing/Spacing.
Squash and Stretch.
Volume.