Monday, September 30, 2019

Assignment 3: Stop Motion Animation

Stop Motion Animation Tutorial with jelly beans
Stop Motion Tips
Occupation: Animator
(notes on) Biology
The Animation of Man
Own the Sky
  • Camera (digital camera, or even a phone)
  • Tripod (or something to hold your camera in the same position)
  • Computer
  • Animating program, such as MonkeyJam, SAM Animation, Dragon Animation or even iMovie, or Windows Movie Maker
  • Materials needed to create your scenes and characters (this can be paper, clay, paints, etc.)
  • Writing Paper
  • And, of course, your IMAGINATION!
STORY
Think of an idea for your animation. Make sure it is feasible with the resources you have, and let your mind loose! It doesn't have to be complicated, or it could be a movie. Just have a brainstorm, and see what you come up with.

STORYBOARD
The next step is to make a storyboard. A storyboard has the main ideas of the story, visually, so it's easier to make the animation. Add the main ideas in each box, and write a short description underneath. This will help you make the animation.

SCENES & CHARACTERS
Now it is time to create your scenes and figures. They can be made from anything, or they can be real life.

Time to get started! Set up a tripod with camera/phone on it, to make sure it doesn't move while you're making the animation. Consistent lighting, exposure and colour balance.
Put your figure in the first position in your scene.
Now, you're ready!
Using your storyboard to help you, take a picture of your figure in the first position. Then, move the figure a little bit, and take the next picture. Move it again, and take another picture. Make sure you don't move the camera AT ANY TIME, and only make SUBTLE MOVEMENTS to your scene and figures each time. Carry on moving the figure, taking a picture every time you do. TIP: if you want a certain point in your animation longer, just take lots of pictures of the same moment! If the scene moves a bit, DON'T WORRY, this will give the animation a bit of character and quirkiness!
You can change the scenes, add more characters, and once you get the hang of it, you'll be having fun, and be great at it! The only thing you need is PATIENCE. Stop-motion can require hundreds, if not thousands of pictures. The one at the start needed 700 photos! So, have fun, practice and be patient.

Once you have all your photos, upload them onto your computer. Make sure you have an animating program, many of which are free (unless you want to be professional), and great for beginners. Here are some examples:

Once you have all your photos, upload them onto your computer. Make sure you have an animating program, many of which are free (unless you want to be professional), and great for beginners. Here are some examples:
  • MonkeyJam
  • SAM Animation
  • Dragon Animation (professional)
  • iMovie
  • Windows Movie Maker

Tuesday, September 24, 2019

Animated E-Card


Here are some suggestions in making your animated e-card. Make sure you have a clear topic/salutation and all of the information related to your topic. Organize the space and the movement to clarify your idea.

Include the following:
  • Opening introduction sets up e-card topic (but doesn't give it away).
  • Establish scene- include a simple background. 
  • Medium shot of point of interest related to card topic.
  • Graphics, colours, character(s), movement relates to topic.
  • Close up of final salutation.

Monday, September 23, 2019

Storyboards and Staging an Animation


When drawing a storyboard consider the composition of the frame and the staging of the scene.Storyboards are comic-like drawings used to show shot layouts and composition. They are an extremely useful tool to have in the animation process to develop the visual narrative of a story.


How to draw a Storyboard

https://www.wikihow.com/Draw-Storyboards 

  1. Develop your idea. Find ways to express the script's themes visually. Complete your script concept before getting started on the storyboards. Know the premise of the story before you get started.
  2. Draw squares for each significant change in the scene. Make a new frame for each significant action or camera motion.
    Find the most crucial element of the scene, and find a way to draw the audience's attention to it in each shot, making it bigger, centering it, zooming into it, etc.
  3. Establish the location, and any important objects early in the scene. Avoid flat, two-dimensional compositions by angling the point of view.
    If the background doesn't change between shots, you can leave it blank and focus on the action.
  4. Write notes, sounds and dialogue underneath. Fill in essential notes about movement, sounds, or special effects. 
  5. Use arrows and notes to show any movement or changes. For example, if you want one character to punch another, you don't need to draw five frames of his fist moving slowly towards a face. Instead, draw one frame of the fist with an arrow indicating the movement.
    You can also use arrows to indicate camera movements, such as pans or tilts. 
  6. Vary the angle of a camera to indicate character relationships and feelings. The angle of your shot tells the audience how to feel about the characters or scenes. Looking down on a character makes them seem weak, fearful, or powerless. Looking up makes someone seem powerful, confident, and dominant. 
    7. Aim for clarity, not perfect symbols or vocab, if you are confused. Don't make them perfect-- a rough sketch is fine.

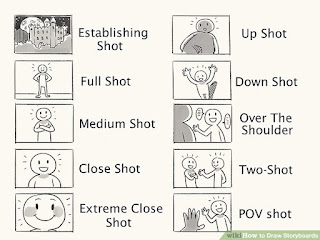
Common Camera Angles

  • Establishing Shots: Quick shots that illustrate the set, location, or start position of the characters.
  • Full, Medium, Close, Extreme Close: If you're showing a character, how much are you showing? Full (FS) shows the whole body, Medium (MS) shows waist up, Close (CU) shows shoulders and head, and Extreme Close Up (ECU) shoes only face.
  • Up Shot / Down Shot: Up Shots look up at a character, while Down Shots look down from above. "Worm's Eye" and "Bird's Eye" are the extreme versions of each.
  • Over the Shoulder (OTS): One of your most important terms, these shots have one person or thing on the side of the frame, back turned, while looking at another. Very common in conversations between two people.
  • Two-shot: When both characters, usually speaking to each other, are both in the frame at once. When drawing dialogue, two-shots often alternate with OTS shots.
  • POV Shots Are simply when the camera mimics the point of view of a character.

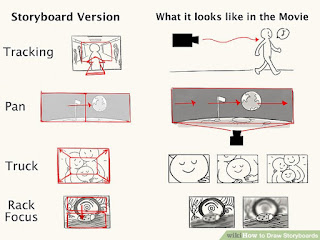
Camera Motions - Moving or Changing Shots 

  • Tracking is when the camera follows the action without cutting, like following someone as they walk down the street. Use arrows to indicate motion, and multiple frames if needed.
  • Pans are when the camera simply rotates in one direction, often following a character as they move or exposing something near them. Draw an arrow illustrating the camera's direction.
  • Trucks are when the camera physically moves in or out. Imagine a shot of a TV, then the camera slowly "trucking" back to reveal a family watching the TV in the living room. Use 4 lines, pointing from the center of the screen out to the corners, to show trucking.
  • Rack Focus is when you have a blurry object in the background and a clear one in the foreground, then the focus shifts from one to the other (it can go in reverse, too). Draw a line indicating where the focus starts and where it moves to
 

Steps for a Great Storyboard

  1. Vary the shots- make some shots wide, others close.
  2. Build tension- Show the audience what the characters don't see. Cut to a bomb counting down. Show shadowy figures in the background.
  3. Use Close-ups (CU)- draw the viewer into the action.
  4. Establishing shots- give your viewers an overview of who is where to help them follow the action.
  5. Cut-aways- shots of a characters fingers twitching, or trophies on a wall, can say more about a character than lengthy dialogue.
  6. Extreme Close-ups (ECU). An extremely close shot of a characters eye, mouth or finger will help enforce the urgency in what is happening.
  7. Point of View shots (POV). Show the audience what your character sees from the characters view point. Point of View shots (POV). Show the audience what your character sees from the characters view point.
  8. Motivate your shots. For instance, in order to have a POV, you need to first show the character looking toward something, which motivates a cut to their POV.
  9. Over the Shoulder shots (OTS). This draws the viewer into the action and makes a scene more intimate.
  10. Use as many drawings as necessary to show the action.

Staging 

is the presentation of an idea so that is clear. This idea can be an action, a personality, an expression, or a mood. The composition of the stage can clarify the idea to the viewer.
  • Composition is an important way to focus attention toward the story. Poorly composed frame will confuse the story.
  • Consider the whole frame
  • Avoid flat staging unless when necessary.
  • Include grids to help "ground" your characters & composition.
  • Use foreground, mid-ground, background, & far background to create depth.
  • Logically group multiple characters.

https://www.youtube.com/watch?v=uDqjIdI4bF4
https://nofilmschool.com/2013/09/storyboarding-tips-dreamworks


Monday, September 16, 2019

Animated Walk Cycle

The walk cycle is one of the most important learning concepts in animation--and also one of the most technically difficult, because it requires so much attention to the movement of opposing limbs.

However difficult, though, if you can learn to master a walk cycle then you can animate just about anything. There are many types of walk cycles, and you can vary the motion to match your character or his/her mood; you can do bouncy walks, shuffling walks, casual slouches. But the first and simplest is the standard upright walk, viewed from the side--and that's what we're going to attack in simplified form today.

You can cover the cycle of a full stride in 8 frames.

Here is a walking cycle Flash Tutorial.
Walking Cycle Tutorial
100 days of walk cycles
Here is a tutorial that criticizes the "Walking Cycle":
April Peter, Animator 
She has a good argument why the walking cycle is not the best way to learn.


  • Never stop thinking about who your character is.
  •  Each walk should be different to suite the weight, gait, strength, body type and attitude of the character. 
  • After you've finished the basic structure, you don't have to keep the keys of all the transformations on the same frames. Each separate rotation or translation can have a different timing.
  • Don't obsess about ending up with identical graphs for each step. Achieving perfect mathematics and achieving a good animation usually aren't the same thing.
  • In fact, try to dirty the walk up. For example, place the feet in a slightly different place every time. Play with the rotations of the torso, head or arms.
  • Sunday, September 15, 2019

    Teach us Something

    Explore a topic through animation. It could be a subject in school; something you have learned in class, or anything that you want to share or clarify to others.
    Communicate visually, 3 to 5 points about your topic.
    Have a main character, draw or import to the library
    Background/setting.
    Visual Story telling, but you can clarify with text.

    For your animation, consider the following Flash Techniques-

    1. Motion tween, shape tween, frame by frame, scale, colour tweens. etc..
    2. Different scenes
    3. Motion guide, and masking
    4. Importing an image & manipulating the image. 
    5. Consider pacing, dynamics, variety of frame, 
    6. Also consider visual compositional techniques: Rule of 3rds, Contrast, Repetition, Framing, Leading Lines.
    7. Sound.
    8. Credits- to create opening and closing credits to suite animation.

    https://www.youtube.com/watch?v=JTb4wUZhBRA

    Minimum 15 seconds.

    Sunday, September 8, 2019

    Animate [Flash] Tutorial: Basic Motion Tweening

    Learn how to use motion tweening:
    Steps to follow:
    • Open a new flash file (Ctrl+N).
      New Document window will appear
      Select General panel and choose Type: Flash Document . Press OK.
    • If your timeline window is not open, press (Ctrl+Alt+T).
    • Now you can see a single Layer called "Layer1" in your timeline Window.
    • Title Layer 1, "Pencil"
    • Select the first frame. Import your image onto stage,pencil image to implement motion tween.
      File>Import>Import to Stage, or just press (Ctrl+R).
      Or you can even draw your own object, you can either choose Rectangular tool or Oval tool from the tool box and draw your desired shape.
    • Now select your object on the stage and press F8 to convert this image to a Symbol. Convert to Symbol window will pop-up.
      Name your Symbol what ever you like.
      Select Graphic behavior and press OK.
    • Your Symbol is in frame 1 of Pencil layer. Select frame 20 and press F6 to insert a new keyframe (or right click "Keyframe")
    • Still keeping playhead on frame 20, move your Symbol to any other position other than the present one.
    • Select any frame between, 2 to 19, then right click select "Motion Tween". Now your Layer will look something like the one shown below.

    • Now press (Ctrl+Enter) to view your motion tween.
    http://www.entheosweb.com/Flash/motion_tween.asp
    Try the following tutorials:
    1. motion tween
    2. shape tween
    3. masking
    4. fade
    5. zoom
    6. bouncing effect

    Thursday, September 5, 2019

    Intro to Animate [Flash]Animation

    We are going jump ahead and play, draw and animate in Adobe Animate [aka Flash]. Animate is a fun program that makes animation easy... well it takes a bit of time to learn, but there are many things it can do. It can help you create digital animations, help you design games, and help generate cool websites. I say it can help, because you are the designer and creator, you have to make the choices to create your piece.

    https://helpx.adobe.com/ca/animate/using/using-stage-tools-panel.html

    Here's an intro to Flash:
    Animator vs. Animation

    We are going to learn about the following:
    • The stage
    • Timeline
    • Properties
    • Tool bar
    • Library
    • Document set-up
    • Frame by frame animation
    • Creating a symbol
    • Key frames
    • Motion tweening
    • Scale
    • Colour- Tone/alpha