Tuesday, November 27, 2018

Blender Basics Tutorials

We will continue to doodle with meshes in edit mode. This is called modelling.

First here are a few basic Blender tutorials :
Blender Beginner Basics
https://www.youtube.com/watch?v=zOvawDOWqC4
Blender Basics 02 Intro to Interface
Blender Basics 03 Modeling
Blender Basics 04 Intro to Animation
05- Basic Shading & Lighting
06- Rendering
Converting to an animation

Modelling tutorials:
ianscott888 -Adroid character
ianscott888 -car

To learn about how to add materials (colours, glass, metal, plastic), watch these:
cgboorman
Super3boy

If you feel behind, these tutorials are great:
Getting Started

Here are some cites that have advanced tutorials:
Blender Cookie
Blender Guru
BlenderDiplom

Blender website

Good luck!


Friday, November 16, 2018

Stop Motion Ideas/Storyboards

We will start class by watching Zero today.

Now that we have watched several different styles of stopmotion and clay mation animations, it is your turn to come up with your own ideas...
  1. Brainstorm ideas, and materials.
  2. Pitch your idea, one or two sentence description of your intended animation.                        Stop Motion Animation Idea
  3. Storyboard in detail, your animation- consider lighting, framing, and angles.
  4. Gather your materials for your animation.
  5. Create your set(s).
  6. Start filming.
  7. Edit
  8. Titles
  9. Render
  10. Share

Tuesday, November 13, 2018

Stop Motion Examples

Stop motion animation (also called stop frame animation) is animation that is captured one frame at time, with physical objects that are moved between frames. When you play back the sequence of images rapidly, it creates the illusion of movement.

Spaghetti
Spinning Yarn
Nat Geo Adventure
Shugo Tokumaru / Katachi
MUTO a wall-painted animation by BLU
Paper Animation
Live Stop Motion
Zero
Gulp
The Making of Gulp
Marker Maker
Her Morning Elegance
The Making of "Her Morning Elegance"
Light Painting- Stop Motion

Planning Your Stop-Motion Animation

1. Brainstorm your animation ideas (include recycled paper and human interaction into your piece)
2. Sketch out your idea, develop your character(s).
3. Storyboard your animation in sequence/order significant frames or changes. This is the most important time in your creative process:
  • Make sure to establish your scene, consider medium shots to establish your character, and close-ups to show details and expressions, cut aways, and frame composition. 
  • Also plan your mood: lighting, background details, texture, and movement within and between frames. 
  • Consider the space between, pauses, and thoughtful moments.
4. Then list out what you will need for your production-
  • Materials- Recycled paper. Clay? Paper? Whiteboard? String/yarn? Lights?
  • Image capturing device? Camera needs.
  • Equipment needs : Tripod, lighting equipment, background stand...
  • Backgrounds: Paper, fabric, or location.
  • Location: School, home, room?
  • Additional ideas:

Friday, October 12, 2018

Adding Sound to your Adobe Animate Animation

Sound breakdown was often done on separate sheets called bar sheets made by the editor, and given to the animator who would transpose them to his dope sheet. An exposure sheet (also referred to as camera instruction sheet, dope sheet or X-sheet) is a traditional animation tool that allows an animator to organize their thinking and give instructions to the camera operator on how the animation is to be shot. It consists of five sections, and is a bit longer and a bit narrower. Every eighth line down is marked thicker than the rest and shows half a foot of film. One second of animation would take three of these sections.

Creative Commons is a system that allows you to legally use “some rights reserved” music, movies, images, and other content — all for free. CC offers free copyright licenses that anyone can use to mark their creative work with the freedoms they want it to carry. For instance, a musician might use a Creative Commons license to allow people to legally share her songs online, make copies for friends, or even use them in videos or make remixes. 

First watch your cartoon and notice places that will need a sound. Write down all of the sounds that you think you will need.

Animators often organize longer animations using exposure sheets or dope sheets. Exposure sheets are not only used by large animation studios, however. They are also extensively used by independent animators as a personal aid in the planning, creation and timing of their work as a means to chart up and keep track of the progression of events.

Look through and listen to the Flash Sound library, also check out the sound library in the animation folder.

First organize your sound needs, make a list of your sounds and where you need them.

To Add a Sound-
  1. First add a new layer and dedicated it to sound, or two layers if you want to over lap sounds.
  2. Import your sound to the library if it is from the folder
  3. Create a key frame where you want your sound to begin
  4. Drag your sound into the stage.
  5. You can edit  fades to your sound in the "Property" menu (make sure you have highlighted your sound).
To Record a Sound-
  1. In Audacity, connect a microphone
  2. Check recording levels so that they do not go above the green line into the red, but should be close.
  3. Hit the RECORD button.
  4. Then the STOP when you have finished recording.
  5. You can copy and paste, overlap, fade sounds, adjust levels and add effects in Audacity.
  6. When you are finished, then you FILE, "EXPORT" your sound as a wave file.

Tuesday, October 2, 2018

Animating in Photoshop

Animate a Monty Python-esk opening sequence

  1. Open an image in Photoshop. 
  2. Save this document as a PSD with a new Title.
Now Start Animating...
 
Here is a Monty Python Introduction

Frame animation workflow


In Photoshop, you use the Timeline panel to create animation frames. Each frame represents a configuration of layers.
Note:
You can also create animations using a timeline and keyframes.
 See Creating timeline animations.
Photoshop Frame animation workflow
Illustration of an animation. The unicycle image is on its own layer; the position of the layer changes in each frame of the animation.


To create frame-based animations in Photoshop, use the following general workflow.

Open a new document, or your self-portrait PSD with the layer.

If they are not already visible, open the Timeline, and Layers panels. Make sure the Timeline panel is in frame animation mode. In the middle of the Timeline panel, click the downpointing arrow to choose Create Frame Animation and then click the button next to the arrow.

Add a layer or convert the background layer.

Because a background layer cannot be animated, add a new layer or convert the background layer to a regular layer. See Convert background and layers.

Add content to your animation.

If your animation includes several objects that are animated independently, or if you want to change the color of an object or completely change the content in a frame, create the objects on separate layers.

Add a frame to the Timeline panel.

Select a frame.

Edit the layers for the selected frame.

Do any of the following:

  • Turn visibility on and off for different layers.
  • Change the position of objects or layers to make layer content move.
  • Change layer opacity to make content fade in or out.
  • Change the blending mode of layers.
  • Add a style to layers.
    Photoshop provides tools for keeping characteristics of a layer the same across frames. See Unifying layer properties in animation frames.

Add more frames and edit layers as needed.

The number of frames you can create is limited only by the amount of system memory available to Photoshop.
You can generate new frames with intermediate changes between two existing frames in the panel using the Tween command. This is a quick way to make an object move across the screen or to fade in or out. See Create frames using tweening.

Set frame delay and looping options.

You can assign a delay time to each frame and specify looping so that the animation runs once, a certain number of times, or continuously. See Specify a delay time in frame animations and Specify looping in frame animations.

Preview the animation.

Use the controls in the Timeline panel to play the animation as you create it. Then use the Save For Web command to preview the animation in your web browser. See Preview optimized images in a web browser.

Optimize the animation for efficient download.

Save the animation.

There are different options for saving your frame animation:

  • Save as an animated GIF using the Save For Web command.
  • Save in Photoshop (PSD) format so you can do more work on the animation later.
  • Save as an image sequence, QuickTime movie, or as separate files. See also Export video files or image sequences.

Add frames to an animation


Adding frames is the first step in creating an animation. If you have an image open, the Timeline panel displays the image as the first frame in a new animation. Each frame you add starts as a duplicate of the preceding frame. You then make changes to the frame using the Layers panel.


  1. Make sure the Timeline panel is in frame animation mode.

  2. Click the Duplicate Selected Frames button .

Select animation frames


Before you can work with a frame, you must select it as the current frame. The contents of the current frame appear in the document window.
In the Timeline panel, the current frame is indicated by a narrow border (inside the shaded selection highlight) around the frame thumbnail. Selected frames are indicated by a shaded highlight around the frame thumbnails.

Select one animation frame


  • Do one of the following in the Timeline panel:

    • Click a frame.
    • Click the Select Next Frame button  to select the next frame in the series as the current frame.
    • Click the Select Previous Frame button  to select the previous frame in the series as the current frame.
    • Click the Select First Frame button  to select the first frame in the series as the current frame.

Select multiple animation frames


  • In the Timeline panel, do one of the following:

    • To select contiguous multiple frames, Shift-click a second frame. The second frame and all frames between the first and second are added to the selection.
    • To select discontiguous multiple frames, Ctrl‑click (Windows) or Command-click (Mac OS) additional frames to add those frames to the selection.
    • To select all frames, choose Select All Frames from the panel menu.
    • To deselect a frame in a multiframe selection, Ctrl-click (Windows) or Command-click (Mac OS) that frame.

Edit animation frames


  1. In the Timeline panel, select one or more frames.

  2. Do any of the following:

    • To edit the content of objects in animation frames, use the Layers panel to modify the layers in the image that affect that frame.
    • To change the position of an object in an animation frame, select the layer containing the object in the Layers panel and drag it to a new position.
    Note:
    You can select and change the position of multiple frames. However, if you drag multiple discontiguous frames, the frames are placed contiguously in the new position.

    • To reverse the order of animation frames, choose Reverse Frames from the panel menu.
    Note:
    The frames you want to reverse do not have to be contiguous; you can reverse any selected frames.

    • To delete selected frames, choose Delete Frame from the Timeline panel menu or click the Delete icon , then click Yes to confirm the deletion. You can also drag the selected frame onto the Delete icon.

Unify layer properties in animation frames


The unify buttons (Unify Layer Position, Unify Layer Visibility, and Unify Layer Style) in the Layers panel determine how the changes you make to attributes in the active animation frame apply to the other frames in the same layer. When a unify button is selected, that attribute is changed in all the frames in the active layer; when that button is deselected, changes apply to only the active frame.
The Propagate Frame 1 option in the Layers panel also determines how the changes you make to attributes in the first frame will apply to the other frames in the same layer. When it is selected, you can change an attribute in the first frame, and all subsequent frames in the active layer will change in relation to the first frame (and preserve the animation you have already created).

Unify layer properties


  1. In the Timeline panel, change the attribute to one frame.

  2. In the Layers panel, click Unify Layer Position , Unify Layer Visibility , or Unify Layer Style  to have the changed attribute apply to all other frames in the active layer.

Propagate Frame 1


  1. In the Layers panel, select the Propagate Frame 1 option.

  2. In the Timeline panel, change the attribute for the first frame.

    The changed attribute is applied (in relation) to all subsequent frames in a layer.
Note:
You can also propagate frames by Shift-selecting any consecutive group of frames in the layer and changing an attribute in any of the selected frames.

Show or hide unify layers buttons


  • Choose Animation Options from the Layers panel menu, and then choose one of the following:

    Automatic
    Displays the unify layers buttons when the Timeline panel is open.

    Always Show
    Displays the unify layers buttons whether the Timeline panel is open or closed.

    Always Hide
    Hides the unify layers buttons whether the Timeline panel is open or closed.

Copy frames with layer properties


To understand what happens when you copy and paste a frame, think of a frame as a duplicate version of an image with a given layer configuration. When you copy a frame, you copy the configurations of layers (including each layer’s visibility setting, position, and other properties). When you paste a frame, you apply that layer configuration to the destination frame.


  1. Select one or more frames you want to copy in the Timeline panel.

  2. Choose Copy Frame(s) from the panel menu.

  3. Select a destination frame or frames in the current animation or another animation.

  4. Choose Paste Frame(s) from the panel menu.

  5. Select a Paste method:

    Replace Frames
    Replaces the selected frames with the copied frames. No new layers are added. The properties of each existing layer in the destination frames are replaced by those of each copied layer. When you paste frames between images, new layers are added to the image; however, only the pasted layers are visible in the destination frames (the existing layers are hidden).

    Paste Over Selection
    Adds the contents of the pasted frames as new layers in the image. When you paste frames into the same image, using this option doubles the number of layers in the image. In the destination frames, the newly pasted layers are visible, and the original layers are hidden. In the non-destination frames, the newly pasted layers are hidden.

    Paste Before Selection or Paste After Selection
    Adds the copied frames before or after the destination frame. When you paste frames between images, new layers are added to the image; however, only the pasted layers are visible in the new frames (the existing layers are hidden).

  6. (Optional) To link pasted layers in the Layers panel, select Link Added Layers.

    This option works only when pasting frames into another document. Select it when you plan to reposition the pasted layers as a unit.

  7. Click OK.

Create frames using tweening


The term tweening is derived from “in betweening,” the traditional animation term used to describe this process. Tweening (also called interpolating) significantly reduces the time required to create animation effects such as fading in or fading out, or moving an element across a frame. You can edit tweened frames individually after you create them.
You use the Tween command to automatically add or modify a series of frames between two existing frames—varying the layer properties (position, opacity, or effect parameters) evenly between the new frames to create the appearance of movement. For example, if you want to fade out a layer, set the opacity of the layer in the starting frame to 100%; then set the opacity of the same layer in the ending frame to 0%. When you tween between the two frames, the opacity of the layer is reduced evenly across the new frames.
Photoshop create frames using tweening
Using tweening to animate text position


  1. To apply tweening to a specific layer, select it in the Layers panel.

  2. Select a single frame or multiple contiguous frames.

    • If you select a single frame, you choose whether to tween the frame with the previous frame or the next frame.
    • If you select two contiguous frames, new frames are added between the frames.
    • If you select more than two frames, existing frames between the first and last selected frames are altered by the tweening operation.
    • If you select the first and last frames in an animation, these frames are treated as contiguous, and tweened frames are added after the last frame. (This tweening method is useful when the animation is set to loop multiple times.)

  3. Do one of the following:

    • Click the Tweens button  in the Timeline panel.
    • Choose Tween from the panel menu.

  4. Specify the layer or layers to be varied in the added frames:

    All Layers
    Varies all layers in the selected frame or frames.

    Selected Layer
    Varies only the currently selected layer in the selected frame or frames.

  5. Specify layer properties to be varied:

    Position
    Varies the position of the layer’s content in the new frames evenly between the beginning and ending frames.

    Opacity
    Varies the opacity of the new frames evenly between the beginning and ending frames.

    Effects
    Varies the parameter settings of layer effects evenly between the beginning and ending frames.

  6. If you selected a single frame in step 2, choose where to add frames from the Tween With menu:

    Next Frame
    Adds frames between the selected frame and the following frame. This option is not available when you select the last frame in the Timeline panel.

    First Frame
    Adds frames between the last frame and first frame. This option is available only if you select the last frame in the Timeline panel.

    Previous Frame
    Adds frames between the selected frame and the preceding frame. This option is not available when you select the first frame in the Timeline panel.

    Last Frame
    Adds frames between the first frame and last frame. This option is available only if you select the first frame in the Timeline panel.

  7. In the Frames To Add box, enter a value, or use the Up or Down Arrow key to choose the number of frames. (This option is not available if you selected more than two frames.)

  8. Click OK.

Add a new layer for each new frame


The Create New Layer For Each New Frame command automatically adds a new layer visible in the new frame but hidden in other frames. This option saves time when you are creating an animation that requires you to add a new visual element to each frame.


  • Choose Create New Layer For Each New Frame from the Timeline panel menu.

    A check mark indicates that the option is turned on.

Hide layers in animation frames


When you create a new layer, it is visible in all animation frames by default.

  • To show new layers only in active frames, deselect New Layers Visible In All Frames from the Timeline panel menu.
  • To hide a layer in a specific frame, select the frame, and then hide the desired layer in the Layers panel.

Specify a delay time in frame animations


You can specify a delay—the time that a frame is displayed—for single frames or for multiple frames in an animation. Delay time is displayed in seconds. Fractions of a second are displayed as decimal values. For example, one-quarter of a second is specified as .25. If you set a delay on the current frame, every frame you create after that will remember and apply that delay value.


  1. Select one or more frames in the Timeline panel.

  2. Click the Delay value below the selected frame to view the pop‑up menu.

  3. Specify the delay:

    • Choose a value from the pop‑up menu. (The last value used appears at the bottom of the menu.)
    • Choose Other, enter a value in the Set Frame Delay dialog box, and click OK. If you selected multiple frames, specifying a delay value for one frame applies the value to all frames.

Choose a frame disposal method


The frame disposal method specifies whether to discard the current frame before displaying the next frame. You select a disposal method for animations that include background transparency to specify whether the current frame will be visible through the transparent areas of the next frame.
Photoshop Frame disposal methods
Frame disposal methods

A. Frame with background transparency with Restore To Background option B. Frame with background transparency with Do Not Dispose option 

The Disposal Method icon indicates whether the frame is set to Do Not Dispose  or Dispose . (No icon appears when Disposal Method is set to Automatic.)


  1. Select a frame or frames for which you want to choose a disposal method.

  2. Right-click (Windows) or Control-click (Mac OS) the frame thumbnail to view the Disposal Method context menu.

  3. Choose a disposal method:

    Automatic
    Determines a disposal method for the current frame automatically, discarding the current frame if the next frame contains layer transparency. For most animations, the Automatic option (default) yields the desired results.
    Note:
    To preserve frames that include transparency, select the Automatic disposal option when you are using the Redundant Pixel Removal optimization option.

    Do Not Dispose
    Preserves the current frame as the next frame is added to the display. The current frame (and preceding frames) may show through transparent areas of the next frame. Use a browser to see an accurate preview of an animation using the Do Not Dispose option.

    Dispose
    Discards the current frame from the display before the next frame is displayed. Only a single frame is displayed at any time (and the current frame does not appear through the transparent areas of the next frame).

Specify looping in frame animations


You select a looping option to specify how many times the animation sequence repeats when played.


  • Click the Looping Option Selection box at the lower-left corner of the Timeline panel.

  • Select a looping option: Once, 3 Times, Forever, or Other.

  • If you selected Other, enter a value in the Set Loop Count dialog box, and click OK.
    Note:
    Looping options can also be set in the Save for Web dialog box. For more information, see Save For Web & Devices overview.
  • Monday, October 1, 2018

    Working with Scenes to Add Credit and Title Sequences

    Create an opening title and closing credit sequence for your short animation project.
    Make sure your font, colour, design, and animation works with your animation. Keep it short. Title/credits sequences shouldn't be longer than your animation. That's a challenge since it's a short animation.  Honor your work.

    To organize a document thematically, you can use scenes. For example, you might use separate scenes for an introduction, a loading message, and credits. Though using scenes has some disadvantages, there are some situations in which few of these disadvantages apply, such as when you create lengthy animations. When you use scenes, you avoid having to manage a large number of FLA files because each scene is contained within a single FLA file.
    Using scenes is similar to using several FLA files together to create a larger presentation. Each scene has a Timeline. Frames in the document are numbered consecutively through the scenes. For example, if a document contains two scenes with ten frames each, the frames in Scene 2 are numbered 11–20. The scenes in the document play back in the order they are listed in the Scene panel. When the playhead reaches the final frame of a scene, the playhead progresses to the next scene.
    Disadvantages of scenes
    When you publish a SWF file, the Timeline of each scene combines into a single Timeline in the SWF file. After the SWF file compiles, it behaves as if you created the FLA file using one scene. Because of this behavior, scenes have some disadvantages:
    • Scenes can make documents confusing to edit, particularly in multi-author environments. Anyone using the FLA document might have to search several scenes within a FLA file to locate code and assets. Consider loading external SWF content or using movie clips instead.
    • Scenes often result in large SWF files. Using scenes encourages you to place more content in a single FLA file, which results in larger FLA files and SWF files.
    • Scenes force users to progressively download the entire SWF file, even if they do not plan or want to watch all of it. If you avoid scenes, users can control what content they download as they progress through your SWF file.
    • Scenes combined with ActionScript might produce unexpected results. Because each scene Timeline is compressed onto a single Timeline, you might encounter errors involving your ActionScript and scenes, which typically require extra, complicated debugging.

     Display the Scene panel

    1. Select Window > Other Panels > Scene.

    Add a scene

    1. Select Insert > Scene, or click the Add Scene button  in the Scene panel.

    Delete a scene

    1. Click the Delete Scene button  in the Scene panel.

    Change the name of a scene

    1. Double-click the scene name in the Scene panel and enter the new name.

    Duplicate a scene

    1. Click the Duplicate Scene button  in the Scene panel.

    Change the order of a scene in the document

    1. Drag the scene name to a different location in the Scene panel.

    View a particular scene

    1. Do one of the following:
      • Select View > Go To, and then select the name of the scene from the submenu.
      • Click on the Edit Scene button at the upper right corner of the document window and choose the scene name from the pop-up menu.


    Monday, September 24, 2018

    Flash Animation Project

    CHARACTER
    First develop a character. This could be a self-portrait animation, but the character is not to be you exactly, just an adaptation of you. Maybe an animated instrument, or paintbrush that has your personality or some characteristics that resemble you. You could be a toaster, or a light bulb, or a cat...

    THE STORY
    One story condition: your character/self is to be confronted with a challenging decision. Make the consequences obvious and the decision difficult. The conclusion will be the following through on the choice and the consequences of that choice.

    BRAINSTORM your character(s), scene, props, mood, movement, and the story.

    STORYBOARD
    Include the following in your storyboard:
    1. Character(s)
    2. Background(s) Use more than one scene.
    3. Strong narrative: establish space and character(s), create a conflict, and then resolve.
    4. Include at least 3 perspectives (variety in the frame, use different angles, change the distance to subject, POV or point of view)
    5. Use a Cut-Away- where you switch your frame to draw attention to something and/or lapse time more rapidly.
    For your animation Consider the following Flash Techniques-
    1. Motion tween, shape tween, frame by frame, scale, colour tweens. etc..
    2. Movie clip/symbols
    3. Working with scenes motion guide, 
    4. Layers & grouping layers, 
    5. Bone tool if you are trying walking or running.
    6. Importing an image & manipulating the image (Trace Bitmap),
    7. Sound.
    8. Credits- to create opening and closing credits to suite animation.
    9. Consider pace, dynamics, variety of frame, 
    10. Also consider compositional techniques: Rule of 3rds, Contrast, Repetition, Framing, Leading Lines...

    Thursday, September 20, 2018

    Animate/Flash Tutorial: Bouncing Effect

    Create a Symbol
    • First draw an object for Motion Tween.
      Like in the above demonstration I used heart.
    • Select the object you have drawn and press F8 to convert this object to a Symbol.
    • In the Symbol window which appears now. Name this object Ball_mc, choose Movie clip behavior and bottom center square for registration. Press OK.
    Create a Motion Tween
    • Double click on the Layer and type "Ball".
    • Select Frame 30 and press F6 to insert a keyframe.
    • Select Frame 15 and press F6 to add another keyframe.
    • With the playhead still on Frame 15, hold the Shift key to move the heart_mc in a straight line, and drag the Ball_mc up.
    • Select any frame between Frames 2 and 14 and select Motion from the tween pop-up menu in the Property inspector.
    • Select any frame between Frames 16 and 29 and select Motion from the tween pop-up menu in the Property inspector.
    • Press Ctrl+S to save your changes.
    Create a Shape Tween
    • Insert a new Layer and call it "Shadow".
    • Select the first frame in the Shadow Layer, draw borderless shadow relevant to your Symbol.
    • If your Color Mixture Window is not open, press Shift+F9 to open it.
    • Select Eyedropper tool from your Tool box. Click it on your shadow. Now go to Color Mixture Window and type 25% for Alpha value.

    • Select Frame 30 and press F6 to insert a keyframe, then select Frame 15 and press F6 to insert a keyframe.
    • With the playhead on Frame 15, select the Free Transform tool. Slightly reduce the size of the Shadow.
    • With Frame 15 still selected, select the Eyedropper tool in the toolbar, and then click on your shadow object. Now go to Color Mixture Window and change Alpha value to 10%.
    • Select any frame between Frames 2 and 14 on the Shadow layer. In the Property inspector, select Shape from the Tween pop-up menu.
    • Select any frame between Frames 16 and 29 on the Shadow layer. In the Property inspector, select Shape from the Tween pop-up menu.
    Now its time for Final touch up
    • Select Frame 1 of the Ball layer. Press F6 to add a keyframe. A new keyframe is added, and the playhead moves to Frame 2.
    • Go back to frame 1, select the Free Transform tool from your toolbox.
    • Select the transformation center point (the small circle near the center of the movie clip) and drag it to the bottom of the heart. On the Stage, drag the upper middle transform handle down to slightly compress the heart shape.
    • Right-click Frame 1 of the heart layer and select Copy Frames from the context menu. Go to 29th frame and press F8 to insert a new keyframe. Right-click 29th frame and choose Paste Frame from the context menu.
    • Click on the Stage, away from any objects. Type "28" in the Frame Rate text box of your Property inspector window.
    • On the Ball layer, select any frame between Frames 2 and 14. Then in the Property inspector, in the Ease text box, type 100. Similarly select any frame between Frames 16 and 29 in the same layer, then go back to Property inspector window and type -100 in the Ease text box. Do the same thing to the Shadow layer.
    Press Ctrl+Enter to view your animation.

    Thursday, September 13, 2018

    WALL-E Observations


    Creating the Look of WALL-E

    Choose one of the following questions and respond.
    1. Choose a main character in the animation "WALL-E". 
    2. Describe the character visually.
    3. What do we learn about the character from their visual appearance? Describe the personality of the character and how it relates to their visual construction.
    4. What is the significance of this character- what roll do they play in the over all story- give an example from the animation.
    1. Choose a supporting character in the "WALL-E". 
    2. Describe the character visually.
    3. What do we learn about the character from their visual appearance? Describe the personality of the character and how it relates to their visual construction.
    4. What is the significance of this character- what roll do they support the main character and the over all story- give an example from the animation.
    Overall Story-
    1. What stands out to you as the central theme in the movie? How is it supported by visuals, give an example.
    2. Do you agree with this vision of the future that WALL-E represents? Explain why.
    3. This film makes several statements about modern society. How do you feel about the way consumerism is represented?
    4. WALL-E is a call to action. What are some ways that you/we could prevent this from happening in real life? 
    Save your responses into the share folder with your name.

    Monday, September 10, 2018

    Opening Sequence of Wall-e

    We are going to  preview the opening sequence of Wall-e and make some observations following. Please write down your findings in Word and save it to the "Studentshare" folder with your name.
    1. What kind of character is Wall-e? Describe him visually, how does his appearance reflect his character?
    2. Describe the landscape.
    3. How do they give the sense of a long duration of time?
    4. There is no dialogue for the opening sequence, yet there is a lot communicated. Find one example where you learn something about Wall-e without any descriptive words.
    5. There are many clues in the opening sequence to hint/forshadow future events and past events. Name 3 and explain what the clue is and what it foreshadows.
    Opening Sequence of Wall-E
    Wall-e Behind the scenes
    Interview with Wall-e director

    Animate/Flash Tutorial: Shape Tween

    • Open a new flash file (Ctrl+N).
      New Document window will appear
      Select General panel and choose Type: Flash Document . Press OK.
    • If your timeline window is not open, press (Ctrl+Alt+T).
    • Now you can see a single Layer called "Layer1" in your timeline Window.

    • Select the first frame. Now go to your working area and draw any object. To start off with, may be you can draw a circle.This is going to be your initial object.
      In the above demonstration, my initial object is a short line.
    • Select frame 20 and press F6 to insert a new keyframe.
    • Still keeping playhead on frame 20, delete the object present in your working area. Now draw a different object, may be a square.
      In the pencil demonstration, we have drawn a long line.
    • Select any frame between, 2 to 19 and select Shape from the tween pop-up menu in the Property inspector. Now your Layer will look something like the one shown below.

    • Now press (Ctrl+Enter) to view your motion tween.

    Sunday, September 9, 2018

    Adobe Animate Tutorials

    Start learning how to use Adobe Animate. Then develop a simple character and animate it within the frame. 

    Animate Drawing Tutorial
    2D Animation Tutorials

    Friday, September 7, 2018

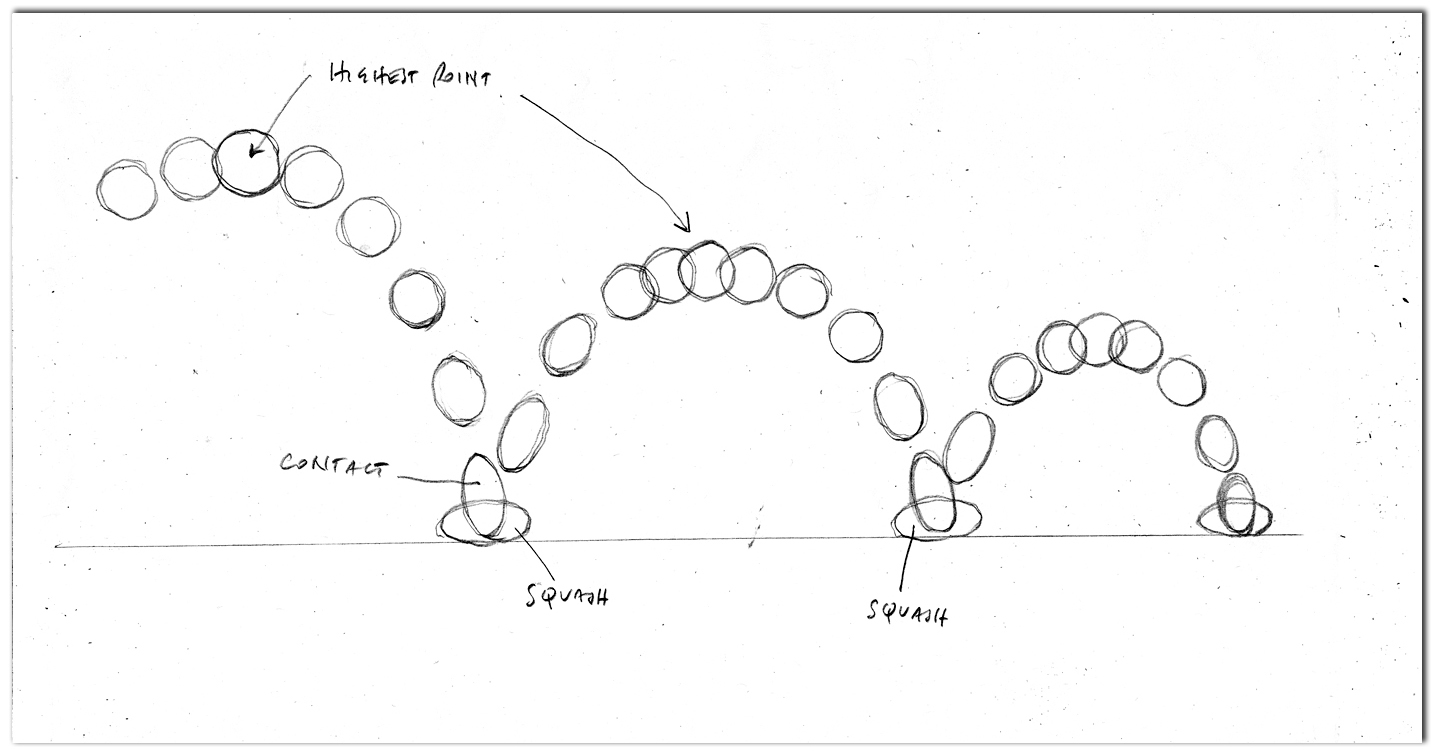
    Ball Sequence: Stretch and Squash

    Try this for fun animation practice...
    Animate a bouncing ball that stretches and squishes, but don't let it loose or add mass.
     
    http://toonator.com/
    Toonator Gallery
    Ball bounce
    TED: Animation Basics

    Squash and stretch is the principal that gives the illusion of weight and flexibility to objects, this is best shown in animation of bouncing balls. The most important aspect of squash and stretch is to ensure the object has a sense of realism even with the most extreme and comical squash and stretch applied to it, this is done by ensuring that the volume of the object does not change at any point.

    Squash and stretch can be used to differentiate between two objects, the degree of squash and stretch changes the consistency and sometimes character of the object in question. Squash and stretch adds realism to objects because they follow the laws of physics that our eyes recognize as correct. An accelerating ball for instance will stretch due to the gravity acting on it, while once the ball hits the floor all that gravitational potential energy is transferred and causes the ball to compress, or squash, under this pressure. Similarly on the way back up on the bounce we would see stretch again as the object pulls away from the surface.

    Leanne Reed Ball Sequence

    The amount of squash and stretch is relative to the material in question, a bowling ball and a tennis ball would have very different reactions to these forces and would be shown in the squash and stretch. The bowling ball would have very little compression when hitting the floor, just as it would have very little stretch on the way down, the tennis ball would react very differently, we would expect to see much more exaggerated squash and stretch, as well as more bounces before coming to a stop.

    It is this difference in materials and the effects using  bouncing balls that I have tried to show in my own bouncing ball animation. I have shown the difference between the two balls by having the lighter of the two balls show a lot more stretch, however due to the laws of gravity both balls fall at the same rate, yet once hitting the ground the lighter ball will bounce a lot higher, with more squash and stretch implying more elasticity than the heavier ball, clearly showing to the viewer that the two balls are very difference.

    This is the first lesson taught to any animation student. It may seem boring, but by following it you will grasp most of the principals used in animation. Study the bouncing ball scene above: Look at it again with all the frames superimposed.
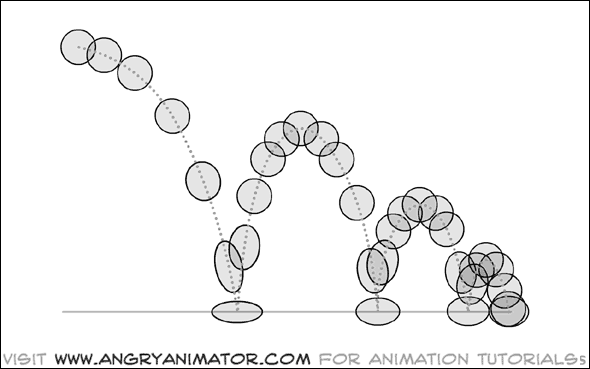


    Now some of the techniques used become easier to see.

    1. Arcs. The ball falls in an elliptical arc through space. Most things move in an arc of some kind. If the ball were to move in a straight line between the high and low points of the bounce, then the action would look very unnatural.

    2. Timing. (or Spacing). As the ball falls it is accelerated by gravity, the gap between each frame growing all the time until the ball contacts the ground. As the ball bounces from the ground the opposite happens: as the ball hops up it moves very fast at first, then slows down by gravity into the high piont of its bounce. Note that at the high point of the bounce the ball is weightless…perfectly balanced between the force of gravity pulling it down, and its own momentum moving it forward.

    3. Squash and Stretch. As the ball falls it stretches. When it impacts the ground it squashes. When it bounces off the ground it stretches again. Note how quickly the ball regains its circular shape. Too much squash and stretch can make an object look “mushy”.

    4. Volume. The ball should remain the same mass as it squashes and stretches. If the ball were to squash too much it would seem to be growing physically bigger. This is very eye catching, and looks weird.

    How to animate the ball. The process of animating the ball is straightforward. On a single sheet of paper, draw the arc path that the ball will follow.
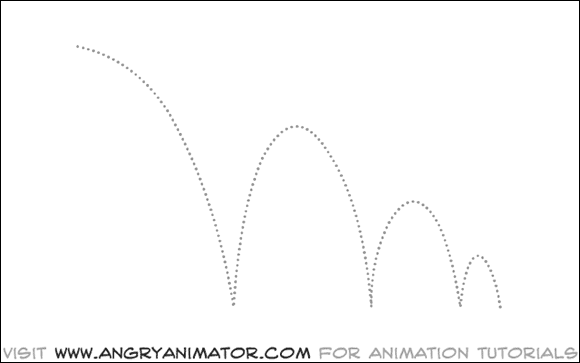
    figure 2: bouncing ball arcs

    On this drawing, tick off the position of each ball on the arc path with an X. Be sure to number them. In feature and tv animation, frames are usually numbered 1,3,5,7,9 and so on. To simplify things here, let’s number them 1,2,3,4, etc. For an explanation of why odd numbers are used in animation, see the appendix at the bottom of the page. It’s really boring, and should be a really nice cure for insomnia.
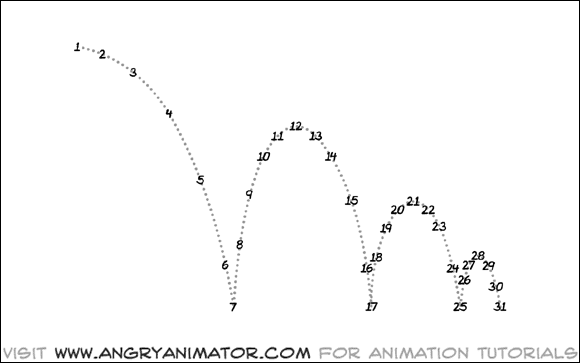
    figure 3: arcs with frame numbers

    If you have a backlight, then switch it on. Put a clean sheet over the arc path drawing. Now you are ready to begin drawing the “Key” drawings of the animation: the points where the ball is at its most extreme. In this example, its highest and lowest points in the bounce.As you can see, frame 1 is the first and highest point in the sequence. It is therefore an extreme drawing. Frame 7 is the squash drawing where the ball hits the ground. It is also an extreme, as are drawings 12,17,21,25,28 and 31.
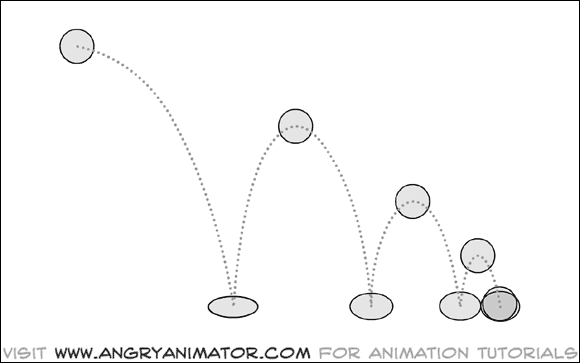
    figure 4: arcs and extreme ball positions

    On separate sheets of paper, you should draw the different key frames as named above. If done correctly you should have a series of drawing numbered 1,7,12,17,21,25,28 and 31.Be sure that you write the frame numbers on the top right and bottom right of each drawing. If your drawing is a key frame (as these are) then put a circle around the number.
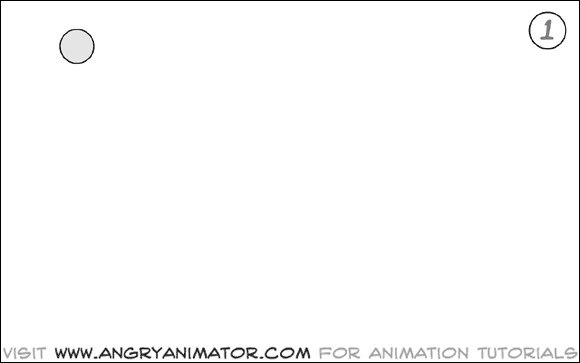
    figure 5: drawing 1

    Place them on the peg bar with the lower numbers on the bottom and the higher numbers on the top. Now you are ready to “roll” the drawings.

    How to Roll the drawings:A lot of people working in animation seem to forget how tricky this is. It is a fairly easy skill, it just takes a little practice. Do it slowly at first, as you progress you’ll begin to do it instinctively. There are people working in the industry who aren’t smart enough to chew gum and fart at the same time, and they can do it. So don’t worry. It takes a little time, but you’ll get the hang of it.
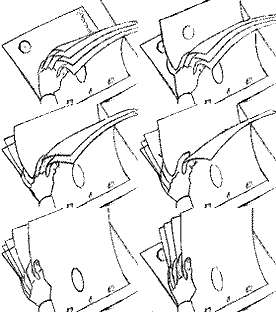
    rolling paper

    Back to the ball: Now you must add the inbetween frames. These are the drawings that go between the keys in order to make the action look smooth. It’s common for these to be called “tweens”, thanks to digital animation programs – but traditional animators call them “inbetweens” (the correct term).
    All frames are equal, but some frames are more equal than others. You must determine which is the most important frame to draw next. Which has the most important action?
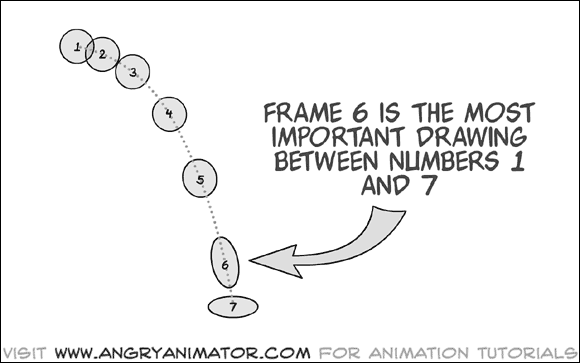
    figure 6: main stretch drawing

    In this case, the most important is frame 6. It is the most stretched frame in the falling sequence. Therefore I would consider this almost as much a key frame as 1 and 7. If you have a backlight, switch it on. Put the arc path drawing on the pegs first. Then put down 1. Put down 7. Then put down a blank sheet. You should see something like this:
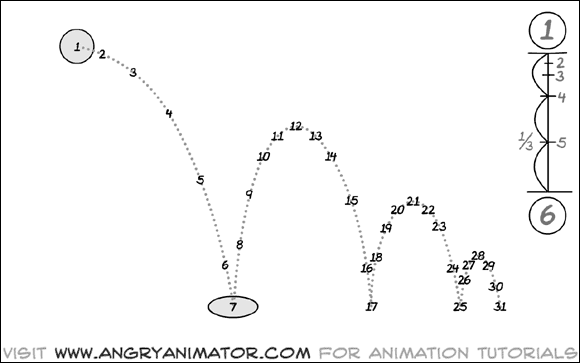
    figure 7: first two keyframes

    Now you are going to draw frame 6. Begin to sketch in the stretched ball. When stretching the ball, keep the volume consistent. The overall mass of the ball must be the same. Position it around the x drawn on the arc path. When you have finished, you will have to flip the paper to see if it moves right:

    How to flip the drawings:
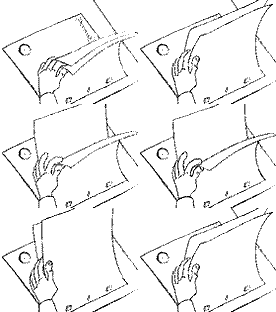
    Flipping is similar to rolling, but whereas with rolling you move through the pages sequentially, here you move from the bottom drawing, to the top one, then to the middle one. “WHY?” you ask….because this way you can see the inbetween in motion and make subtle corrections as you work. Incredible as it seems, this method is far more accurate than a lighttable.
    flipping paper

    Watch the paper closely. Notice that both index and middle fingers are wedged between the top two layers. You begin flipping by holding up both top sheets of paper towards you. You are now looking at the lowest frame, frame 1. Then you drop the two sheets down to the board, revealing the topmost drawing, i.e. the inbetween frame. Then you lift up the top drawing to reveal the one in the middle, i.e the final keyframe. It takes time to get the hang of this. It will be well worth the effort if you do.
    Now you will need to add the remaining inbetween drawings between 1 and 5. The easiestway to do this is with a timing chart. Lets look at what we’ve got so far:
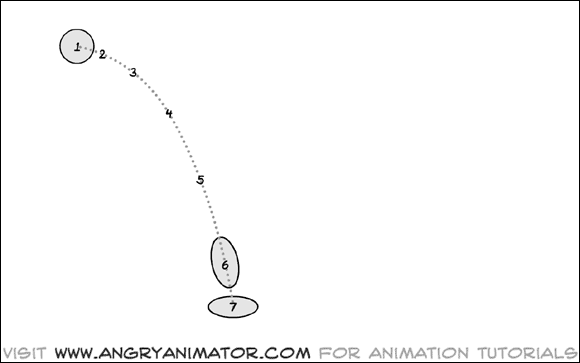
    figure 8: the spacing of the first 7 drawings

    You could “eyeball” all the remaining frames, but the surest way to do them is by writing a timing chart. It will look something like this:
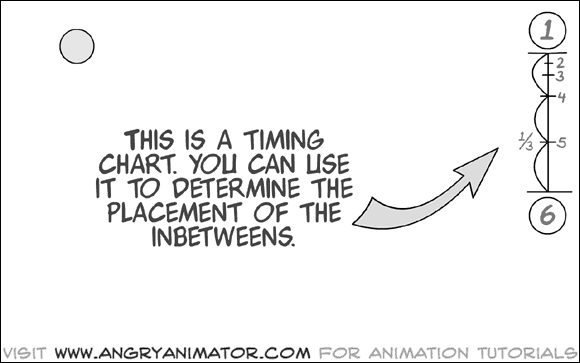
    figure 9: the timing chart

    The timing chart will go on frame 1, beneath the frame number on the top right of the drawing. This chart tells you that the next most important drawing is 5. That’s why it’s underlined. Note how the spacing on the timing chart relates to the spacing on the arc path above. The chart can determine the position of all the inbetween frames, and also their weight, mass, speed, etc.
    Now you have keyframe 1 with a timing chart, and keyframe 6. Simply follow the chart, place the arc path on your drawing board, then 1, Then 6, and proceed to follow the timing chart. Draw 5.
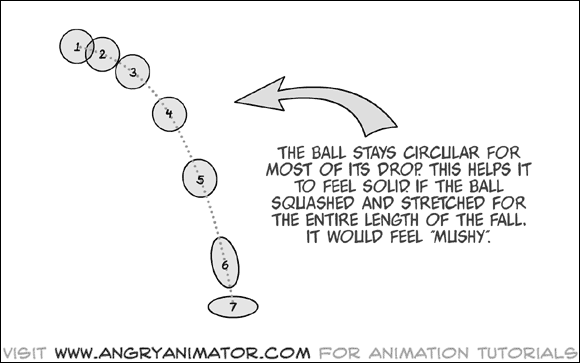
    figure 10: keep the ball shapes solid

    Note: see how quickly the ball regained its shape…if you were to inbetween the shape as well as the position of the ball then the ball would feel very mushy…by drawing 5 as circular, the scene will be much snappier. Repeat inbetweening until the first arc of the bounce is complete. Repeat the process for all frames of the scene.

    I have included all the original frames for this scene as digital files. They should print out onto regular A4 printer paper. You can print them out and peg them up onto strips of punched paper, allowing you to roll through the scene. You line them up with the crosshairs on the corners of the page. Simply paste up frame 1 as you like it, then put it on your drawing board. Then put down a strip of punched paper, and position frame 2 with its crosshairs lined up with frame 1.
    IMPORTANT: all frames should be positioned against frame 1, otherwise the scene will “drift”.

    drawing board

    You can find the files here: Bouncing ball image files . You’ll need winrar to decompress them (most zip programs should work on them).
    Appendix: Numbering drawings.

    Most animation is still produced for film and tv. Film is projected at 24 frames per second (fps). Early cartoons were all drawn with 24 drawings for every second of film, i.e. onedrawing for every frame of film. Some clever chap finally realised that the animation looked just as good if only 12 drawings were drawn per second of film. Each drawing would be shot twice, to keep the overall timing the same. Nobody noticed the difference, and a lot of carpal tunnel doctors went out of business.
    This discovery can be attributed entirely to prohibition. Animators of the twenties were notorious alcoholics. Not these days, glad to say. Today’s breed are wholesome family men, loyal to their wives, good fathers, upstanding members of society, clean living wackos.

    The practice of animating 12 fps is called animating “on twos”, and the practice of animating 24 fps is called animating “on ones”. It was still occasionally necessary to animate scenes on ones if a fast action was required, or if the camera panned over the background, i.e. move from left to right to follow a character across the screen. Such shots would look jerky if shot on twos.

    When working on twos the animators usually number their frames with odd numbers. 1,3,5 and so on. Frame one is shot twice, frame two is shot twice, ad nauseum. If a point in the scene demands a fast action such as a punch or a shake, then the scene can be switched to ones at thatpoint. The numbering can then include the even numbers that will make the action smoother.

    If all this sounds like gibberish, don’t worry. It’s not relevant to anything in the next few lessons.
    One last comment about timing: Today a lot of animation is made on computers, and can be projected at any frame rate desired. 10 fps looks fine. Most Japanese animation has been animated at 8 fps for years…a method known as animating “on threes”, as each drawing is shot 3 times, producing 8 frames per second.

    That’s it for the ball…

    First-
    Do some direct sketch observations of a ball. Use a light and play with shading and shadows figure/ground relationships.

    Second-
    Throw the ball in the air and observe the weight of the ball, how gravity effects it. Then draw a bounce sequence on one page [see above illustration].

    Third-
    Animate a bounce sequence see below...
    View Angry Animator Tutorial
    Or below I grabbed from the angry animator.

    This exercise will teach you the most important principles of animation, namely:
    Arcs.
    Timing/Spacing.
    Squash and Stretch.
    Volume.