When drawing a storyboard consider the composition of the frame and the staging of the scene.Storyboards are comic-like drawings used to show shot
layouts and composition. They are an extremely useful tool to have in the animation process to develop the visual narrative of a story.
How to draw a Storyboard
https://www.wikihow.com/Draw-Storyboards
-
Develop your idea. Find ways to express the script's themes visually. Complete your script concept before getting started on the storyboards. Know the premise of the story before you get started.
-
Draw squares for each significant change in the scene. Make a new frame for each significant action or camera motion.
Find the most crucial element of the scene, and find a way to draw the
audience's attention to it in each shot, making it bigger, centering it,
zooming into it, etc.
-
Establish the location, and any important objects early in the scene. Avoid flat, two-dimensional compositions by angling the point of view.
If the background doesn't change between shots, you can leave it blank and focus on the action.
-
Write notes, sounds and dialogue underneath. Fill in essential notes about movement, sounds, or special effects.
-
Use arrows and notes to show any movement or changes. For example, if you want one character to punch another, you don't need
to draw five frames of his fist moving slowly towards a face. Instead,
draw one frame of the fist with an arrow indicating the movement.
You can also use arrows to indicate camera movements, such as pans or tilts.
-
Vary the angle of a camera to indicate character relationships and feelings. The
angle of your shot tells the audience how to feel about the characters
or scenes. Looking down on a character makes them seem weak, fearful, or
powerless.
Looking up makes someone seem powerful, confident, and dominant.
7. Aim for clarity, not perfect symbols or vocab, if you are confused. Don't make them perfect-- a rough sketch is fine.
Common Camera Angles
-
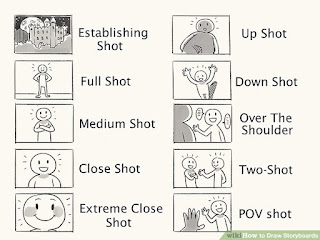
Establishing Shots: Quick shots that illustrate the set, location, or start position of the characters.
-
Full, Medium, Close, Extreme Close: If you're showing a
character, how much are you showing? Full (FS) shows the whole body,
Medium (MS) shows waist up, Close (CU) shows shoulders and head, and
Extreme Close Up (ECU) shoes only face.
-
Up Shot / Down Shot: Up Shots look up at a character, while Down
Shots look down from above. "Worm's Eye" and "Bird's Eye" are the
extreme versions of each.
-
Over the Shoulder (OTS): One of your most important terms, these
shots have one person or thing on the side of the frame, back turned,
while looking at another. Very common in conversations between two
people.
-
Two-shot: When both characters, usually speaking to each other,
are both in the frame at once. When drawing dialogue, two-shots often
alternate with OTS shots.
-
POV Shots Are simply when the camera mimics the point of view of a character.
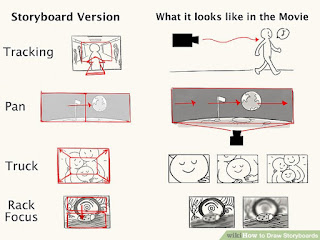
Camera Motions - Moving or Changing Shots
-
Tracking is when the camera follows the action without cutting,
like following someone as they walk down the street. Use arrows to
indicate motion, and multiple frames if needed.
-
Pans are when the camera simply rotates in one direction, often
following a character as they move or exposing something near them. Draw
an arrow illustrating the camera's direction.
-
Trucks are when the camera physically moves in or out. Imagine a
shot of a TV, then the camera slowly "trucking" back to reveal a family
watching the TV in the living room. Use 4 lines, pointing from the
center of the screen out to the corners, to show trucking.
-
Rack Focus is when you have a blurry object in the background and
a clear one in the foreground, then the focus shifts from one to the
other (it can go in reverse, too). Draw a line indicating where the
focus starts and where it moves to
Steps for a Great Storyboard
- Vary the shots- make some shots wide, others close.
- Build tension- Show the audience what the characters don't see. Cut
to a bomb counting down. Show shadowy figures in the background.
- Use Close-ups (CU)- draw the viewer into the action.
- Establishing shots- give your viewers an overview of who is where to help them follow the action.
- Cut-aways- shots of a characters fingers twitching, or trophies on a
wall, can say more about a character than lengthy dialogue.
- Extreme Close-ups (ECU). An extremely close shot of a characters eye, mouth
or finger will help enforce the urgency in what is happening.
- Point of View shots (POV). Show the audience what your character sees
from the characters view point. Point of View shots (POV). Show the
audience what your character sees from the characters view point.
- Motivate your shots. For instance, in order to have a POV, you need
to first show the character looking toward something, which motivates a
cut to their POV.
- Over the Shoulder shots (OTS). This draws the viewer into the action and makes a scene more intimate.
- Use as many drawings as necessary to show the action.
Staging
is the presentation of an idea so that is clear. This idea
can be an action, a personality, an expression, or a mood. The
composition of the stage can clarify the idea to the viewer.
- Composition is an important way to focus attention toward the story. Poorly composed frame will confuse the story.
- Consider the whole frame
- Avoid flat staging unless when necessary.
- Include grids to help "ground" your characters & composition.
- Use foreground, mid-ground, background, & far background to create depth.
- Logically group multiple characters.
https://www.youtube.com/watch?v=uDqjIdI4bF4
https://nofilmschool.com/2013/09/storyboarding-tips-dreamworks


